

Today I posted this photo of my clam shells.
There were a few questions so I thought I would make time for a blog post.
I started this project after visiting a quilt exhibit at the Victoria and Albert Museum in London. A set of clam shell bed hangings caught my attention. You know how that goes? A new project was born.
I had templates sent to the temporary house and quickly found the local quilt shops. I even bought extra templates to lead my friend astray as well!
I decided on a charm, because more is more!
My rows alternate light and dark ever so subtlety.
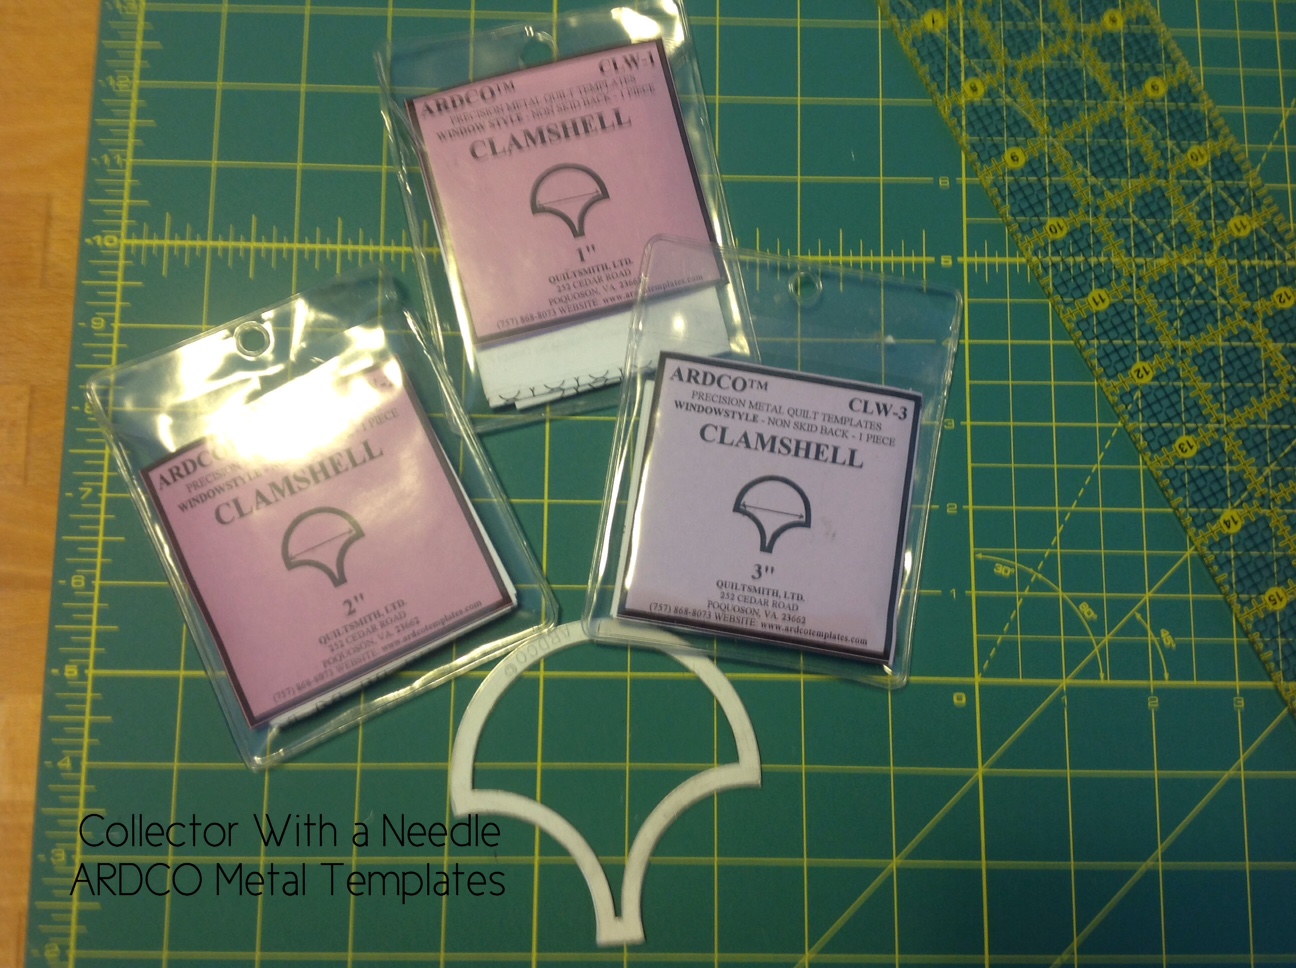
Any template works, don't switch brands in the middle! Check the Length and Width. This is true of piecing papers as well.

I used a header strip to start, it is slightly wider than I wanted the quilt.
The first row of clams has a short side seam.
The first row is basted on the muslin creating the start of the rows. Later the basting threads and muslin will be removed.
Enlarge the photo to see the notes.
(BTW - That brown and pink print is one of the V&A prints sold at the exhibit)

It is a great pick up project because you can add a clam at a time. It allows for quick starts and stops, if needed. I think I timed myself once and it took about 45 minutes to add a row.
I am not embarrassed to show you my stitches.
I think I am better every year. If anything I might have too many stitches per inch. These clams measure 3" across when finished.
They look hand pieced, and really are, in a needle turn kind of way.

The sides will be trimmed once I am ready for a border or binding once I decide. Be careful with these, this is a lot of bias.
There are two lights complete.
The third light clam at the bottom is just started.
For a while I was short on lights. Made me wish I hadn't don't the light and dark rows. Also, being a charm I always "needed" new fabric.

Find the center of the cut out clam. This is A, the place the previous clams meet. Turn it under your seam allowance and pin.
Next I do the two ends: B & C.
(I am using small appliqué pins I keep in a finger pin cushion)
Continue pinning D, E, F as needed.
Needle turn and stitch across the top of the clam.
I like to use a neutral thread and keep going adding clams. No need to start and stop.
I hope this was helpful!
There is no wrong way, stitch the way you find comfortable.
Enjoy,
Dawn
PS
My clams will be about 60 x 80 before border or binding
Thanks for your blog! I have wanted to start mine for a while. My clamshells seem to be tall. Have you seen any templates in your searches that resemble mine? Thinking I will have to make one to fit.
ReplyDeleteLoved this detailed tutorial! You are so generous with your time and expertise!
ReplyDeleteLove this.....have always wanted to do one........but.....so many quilts, so little time!!
ReplyDeleteDawn Precioso.
ReplyDeleteMe encanta este patrón
gracias por la explicacion
saludos
Love, love your clams! Thanks for the tutorial. It would be fun to try someday.
ReplyDeleteBeautiful! Thanks for sharing how you do it.
ReplyDeleteThanks so much Dawn - excellent explanation. I just hopped over from IG. So handy to have a blog for tutorials and thanks for putting it up so quickly. I will be privately pinning this as I also prefer to avoid glue. I've only done clams with papers and glue stick. It works well but there is the glue... I'll now look out for some of these templates :)
ReplyDeleteThat is a beautiful quilt and a nice tutorial. I did a hexagon quilt with hand stitching, but after a few washes, it fell apart, thought I did a good job on my stitching.
ReplyDeleteDebbie
That is looking fabulous! I have considered the clamshell but was slightly imitated by it. Instead I'm sewing a honeycomb star. I didn't claim sanity just imitation 🙃 Thank you for sharing. It doesn't seem quite so scary with instruction. Happy stitches!
ReplyDeleteWow, what a beautiful project! I know this is something I would never feel comfortable tackling, but I admire those of you who do.
ReplyDeleteA true masterpiece! Beautiful done!
ReplyDeleteI already saw this stunning clamshell-beauty on Fb and Instagram, but over here, on your blog, I found out that you make them just the same way as I do (although I have not made that many clamshells like you yet). I don't even own glue... You made a real good and clear tutorial for doing clamshells this way!
ReplyDeleteThank you Dawn! Beautiful quilt and wonderful tutorial. You have inspired me to start one of my own.
ReplyDeleteIt's beautiful thus far and thanks for showing us how you are doing it :)
ReplyDeleteReally like the way your clams are going! And nice explanation of how you go about it...thumbs up for tackling such a large project. My only “adventure” with clams is making a Sue Daley sewing pouch and I did it the way you describe. Oh and I love to find Clams Casino on a restaurant menu:-)
ReplyDeleteThank you soooo much for sharing Dawn. Love your work x
ReplyDeleteGreat explanation and great project! I love projects/quilts with many, many fabrics and this is definitely a fav! Have fun sewing, it will be fun for us to follow your progress :-)
ReplyDeleteThis is just a gorgeous project - thank you for sharing!
ReplyDeleteI started a clamshell project with this method. Never finished it. Sigh.
ReplyDeleteWhat a beautiful clamshell project! So interesting to read about your process.
ReplyDeleteWhat a great tutorial! Thanks for sharing this gem. I love it!
ReplyDeletePretty quilt! Colors blend so well!
ReplyDeleteOh thank you for this great demonstration! I already have one of these templates, but have always hesitated over started. Just didn't want to use glue and now I know it's possible without.:) Your quilt is looking fabulous, don't second guess the lighter row!
ReplyDeleteThank you for showing the back side! Am I the only one who has been assuming that these were assembled more like hexagons or apple cores (sewn on all sides to the adjacent pieces?
ReplyDeleteGlad to see you are staying out of trouble! When I get home you will have to search my stash if you need more fabrics - which I find hard to believe having seen your stash. But, how were vintage clamshells pieced? all by this hand applique method? have you see any with regular 'curved' piecing from the wrong side...have you tried it that way.? They are small so I suppose that would be quite a challenge to dexterity! You know how I love small piecing but this is not even on my list! Looks lovely, though!.
ReplyDeleteHey very nice blog!
ReplyDeleteThank you for a wonderful post. I have been trying, on and off, to get started on a clamshell piece. Mine are much larger, having used an Accuquilt Die, but I kept getting bogged down with the first row, and how to start it with all the ‘waving in the breeze’ I was working with. I will now attach a backing of muslin with some basting stitches and I’ll be ‘off to the races’. Mine will be done by machine, but some day I hope to do a very small block of them for using as a block in a memory type quilt. Again, thanks for this information.
ReplyDelete